Category Archives: Computers

The state of Proxmark

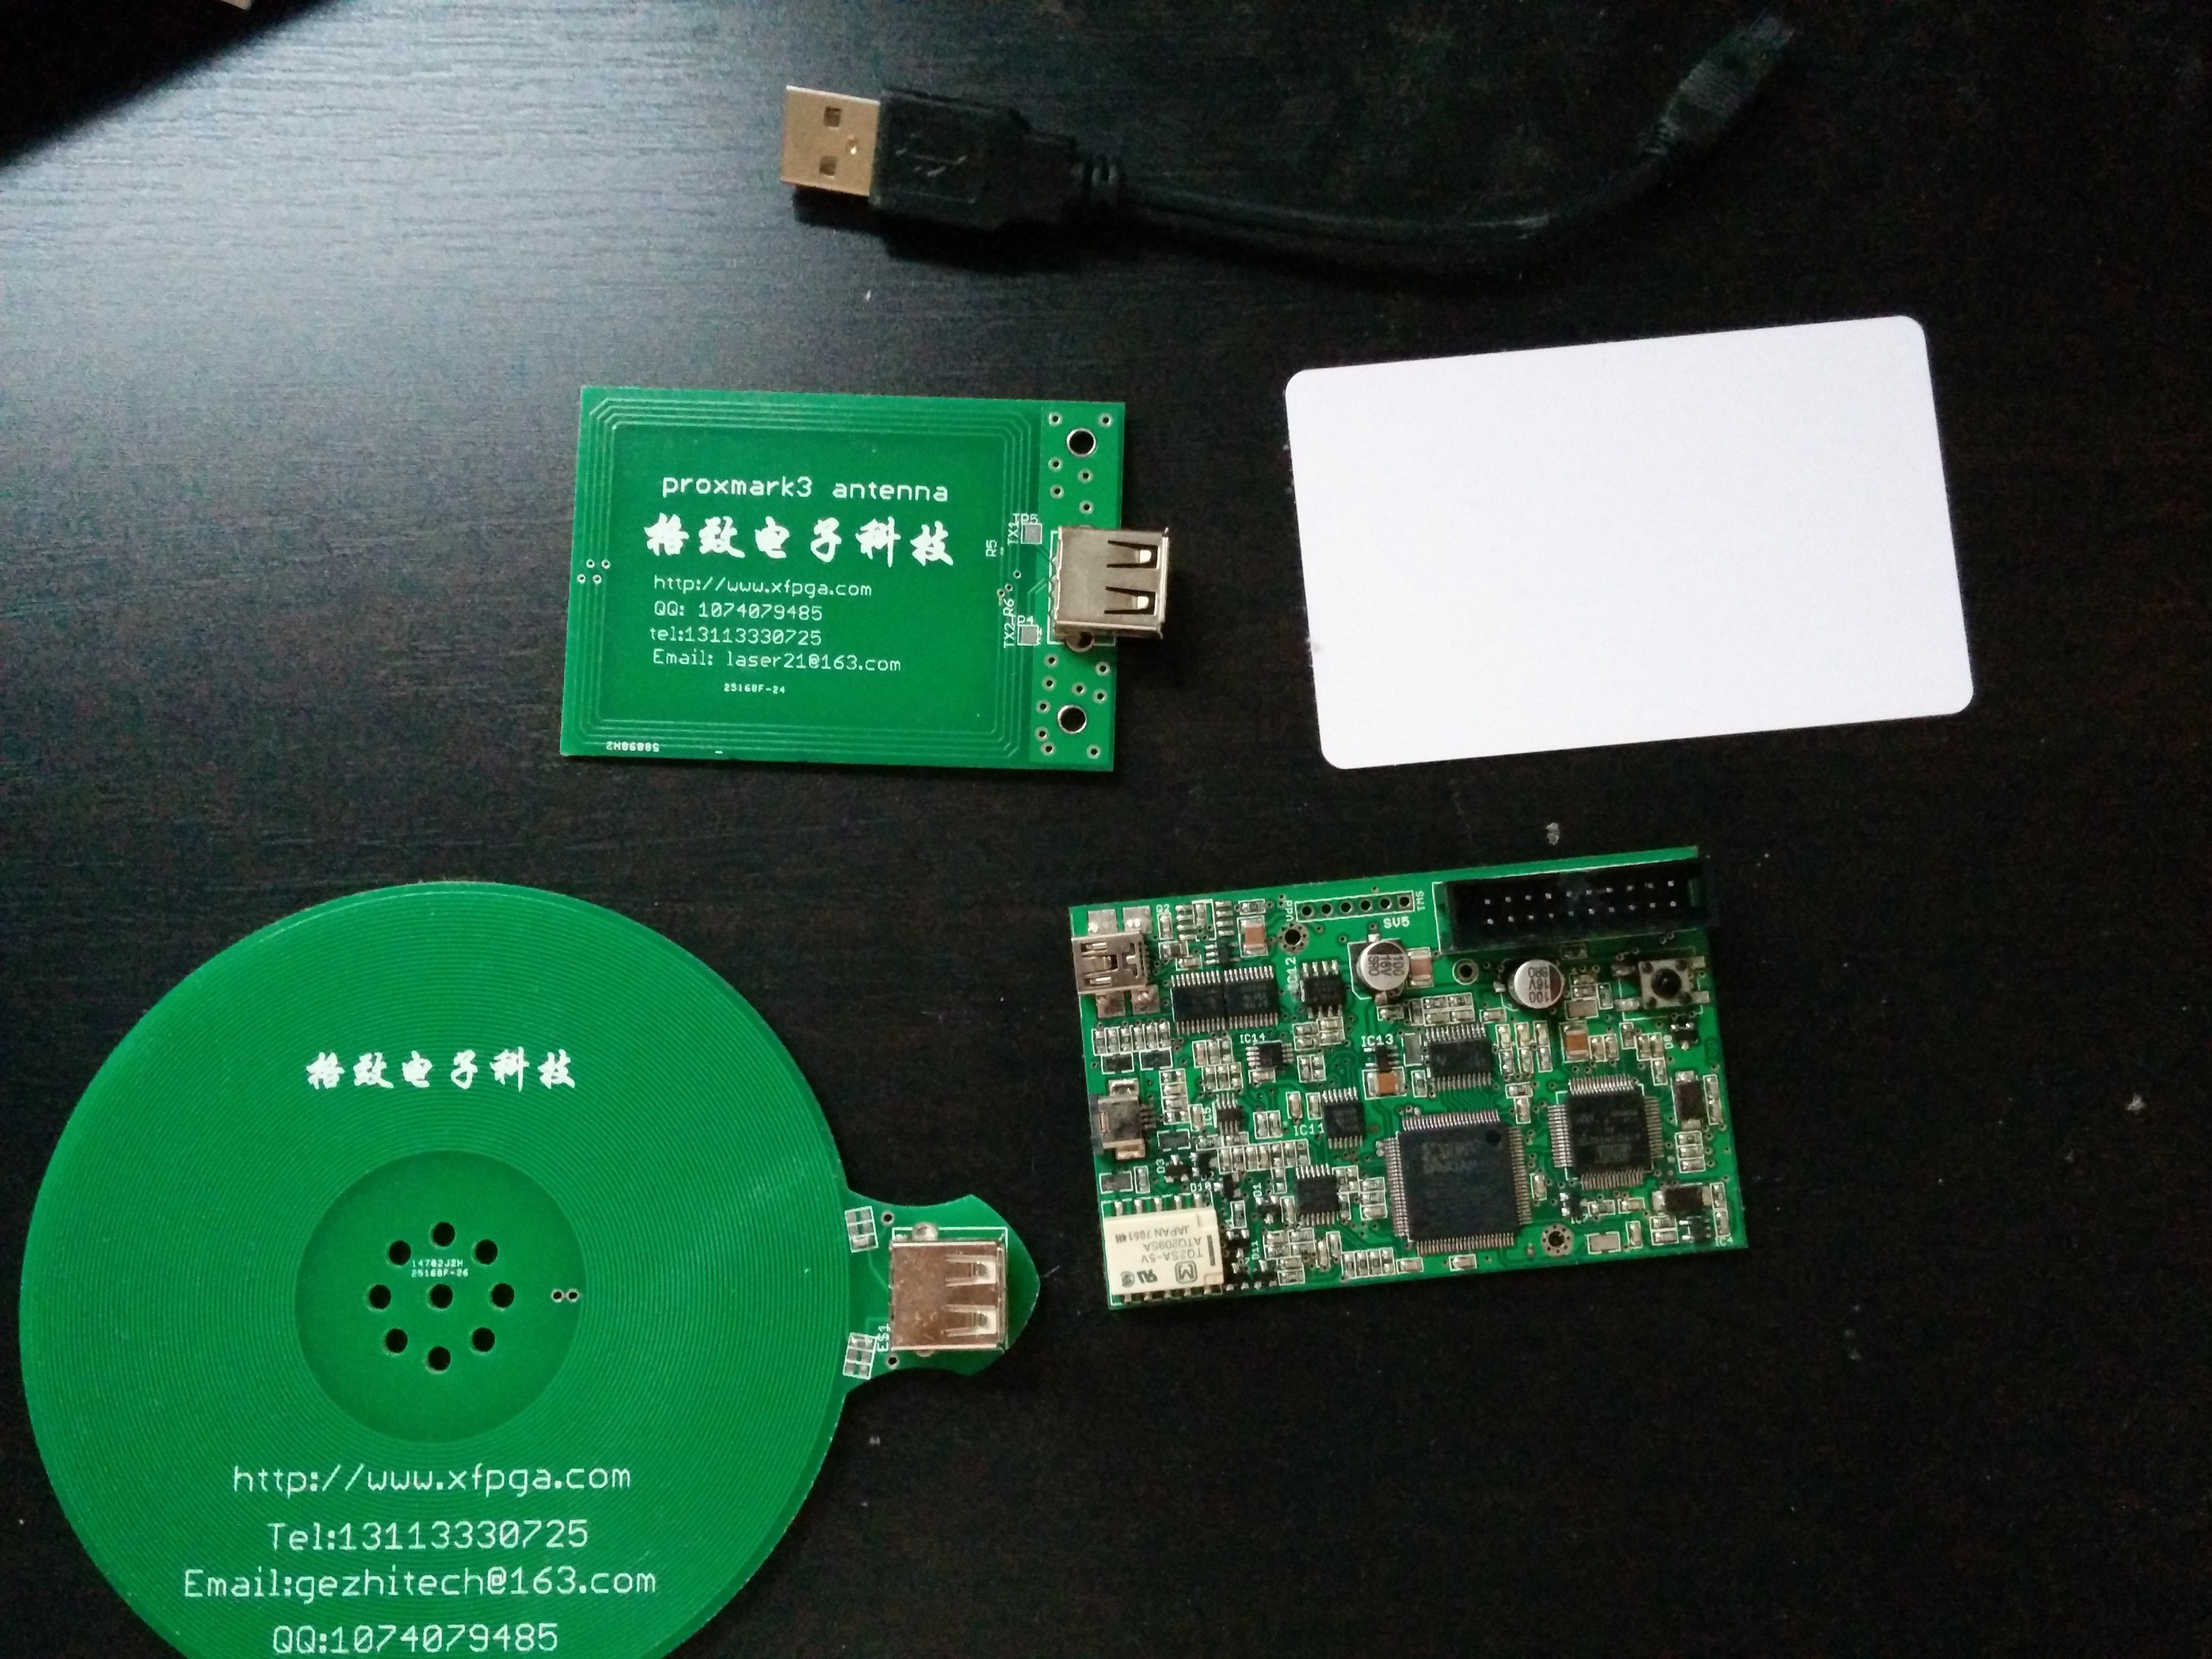
What is the Proxmark3?

The Proxmark3 is fascinating, it has the ability to read and write a wide range of RFID cards, both low-frequency (typically things like door access) and high-frequency (more advanced cards, transit, credit cards, etc). It can also be frustrating, largely due to:

  1. Inconsistent support across OSes
  2. Unclear documentation about identifying RFID cards you find

IMG_20140605_201404

Mac OS X Mavericks + Proxmark3 == sadpanda

TL;DR: don’t try to work with proxmark3 in OS X, it has just enough support to keep you trying, without enough to actually help you excel

There are no official binaries, and no unofficial binaries for OS X so that means we must to go the source.

To compile make sure you have what is in the COMPILING.txt, some of these are more obvious than others.
For example, libreadline:

brew install readline

This however will not link because some conflicting library is installed with XCode. You want to hijack that, use

brew link readline --force

The ARM compiler is easy to install (according to this thread) via github.com/jsnyder/arm-eabi-toolchain. That thread also advises you to use

brew install libusb libusb-compat --universal

for libusb.

Once you’re pretty confident you have most of these dependencies installed, you can attempt to make the project. If it works, good for you. If not, you’ll spend a bunch of time googling. You will almost certainly have to modify the CXXFLAGS, and QTLDLIBS in client/Makefile. There are a few recommendations as to what these should, it’s unclear which of these which is best.

Hopefully, at this point, you can compile the application. it is run from the client directory via

./proxmark3 /dev/ttysXXX.usbXXXX

Unfortunately, if you’re like me, you won’t have any such devices.

To further compound matters, there is a decent chance that your proxmark3 is actually running old firmware and needs to be updated. There was a pretty big shift in the firmware, it used to use libusb but now registers itself as a COM port. I think these were for performance related; but the result is that older firmware can’t use newer software and vice versa. Flashing the old to new requires a little bit of a hybrid approach combined with witch magic.

It’s all about the Kext’s

There is also another issue looming that you might not realize. OS X is going to hijack your usb connection and not let you use it. The proxmark3 app will complain about not being able to claim the device.
Allegedly, you can use what is called a “codeless kext” to force OS X to ignore a device. That is what is hoped to be achieved with make install_kext. This didn’t seem to work for me. I tried poking around for a bit, Apple has this concept of “VendorSpecificDriver” that is meant to allow you to disable OS X from claiming the device before you can. kextutil will become your friend to get this debugged as you attempt to combine this “VendorSpecificDriver” code with the kext created by the Makefile, in a sweet Frankenstein attempt. As far as I can see, this approach no longer seems to work.

In researching this kext, you may see a bunch of things about requiring signing for codeless kexts. I don’t think this is true, in both this story and my own experimentation, using the /System/Library/Extensions/ folder, you are able to load an unsigned kext. However, I was unable to actually get the kext working with my Proxmark, so maybe there is something else I was missing. I also tried a documented alternative approach to unload the kext that Apple was using: kextunload -b com.apple.driver.AppleUSBCDC (You’ll notice CDC which is the “old” style of communication for Proxmark). No luck.

Stop paddling upstream

It was at this point that I decided I should reassess my approach. It turns out that in this thread, there are pre-compiled binaries for proxmark3 for windows. Awesome.

There are even instructions included about updating from the old firmware, which involves lots of holding the proxmark button down while interacting with the device from the computer. I had to flash the update to the new COM style bootloader and also the “bootrom”, “fullimage”, and “OS”, before the device would be probably recognized even with the new driver.

Installing the drivers was again a bit of a pain, but not too bad.

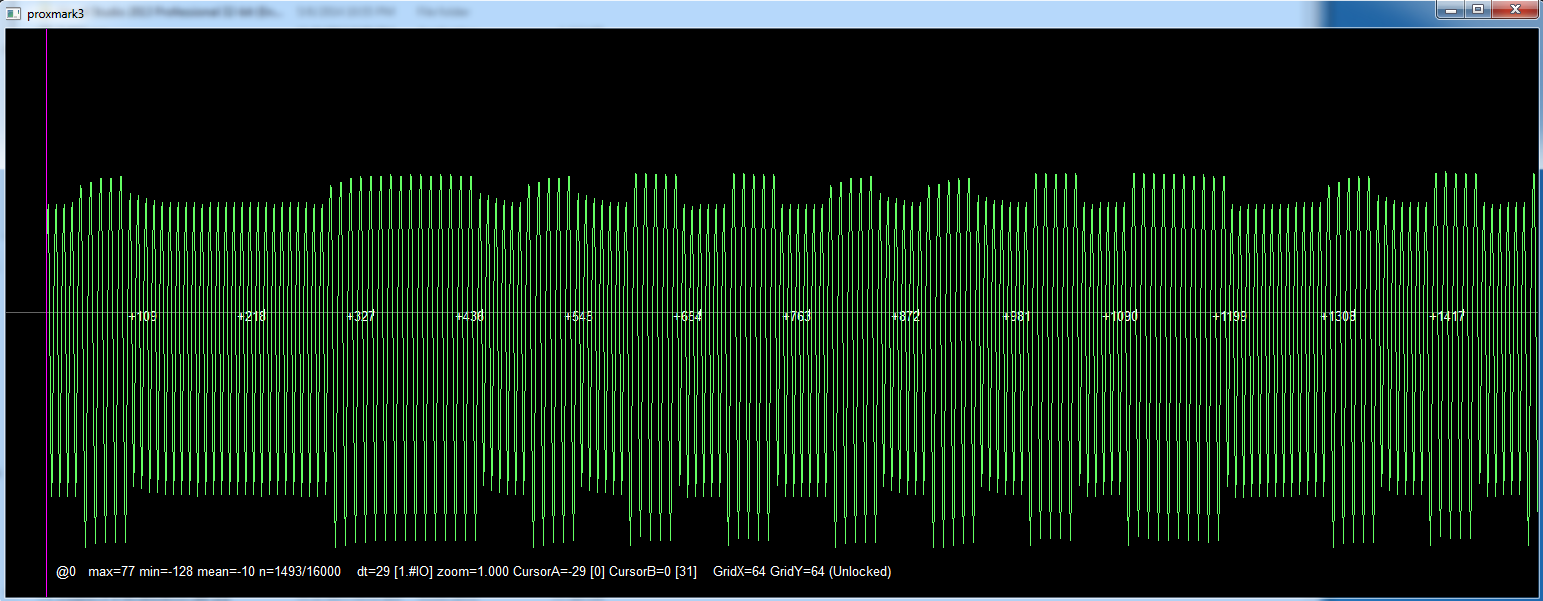
What does this signal mean?

Once the hardware is setup and you’re in action you’re likely to encounter another problem. How do I read this card and make any sense of it? Unfortunately, the answer doesn’t seem to be super simple. Some LF cards are labeled with things like “HID” or “Indala”, which tells you right away what to use. There also seem to be a lot of cards that qualify as “em4x”, particularly “em410”. There’s a good chance you’re trying to read one of these three, but if it’s not your best bet is to turn to the forums or look for any sort of labeling that can help you.

Here are a few of the commands I seemed to use most:

hw tune
hw version
hw tune
lf read
data samples 5000
lf hid fdskdemod

lf_rfid

Be ready for a bit of flakiness, you might have to restart your computer occasionally, or re-plug in the proxmark (frequently). Once it’s reading though, it seems to do it pretty consistently.

cloning?

Cloning cards is a whole new beast. It seems that many cards are not re-writable, or if they are you can’t use the standard cloning provided by the proxmark software. Again, this is a shame because you will see reference to “t55x7” cards, unfortunately it doesn’t seem possible to easily know what card type you have in your hand.

Conclusion

Generally, the Proxmark3 concept is great. I know how difficult it is to foster a good community that can work across the range of software and hardware necessary for a good Proxmark experience, so I applaud the effort. I hope the tools continue to improve.

I’d really like to see a bit more consistency around OS/driver support, and documentation to aid in identifying RFID cards. Hopefully, I can find time to figure some of this out and put in pull requests to the Proxmark3 repository and help the community.

Do you have experience with the Proxmark3? Does it match mine?

Prey in Standalone Mode (OS X)

Prey is a powerful recovery tool for lost/stolen computers and smartphones. Even better is that their software is largely open source available on github.

It’s something I’ve used for some time. They are increasingly pushing you towards using their command center, and freemium service. I understand why they would want to — they are a company that tries to make money, and perhaps more importantly it is far easier for people to get set up and running with their unified service.

However, I like to run what they call “Standalone Mode”. This means that the server will try to ping a webpage I specify, and if it gets a 404 (because you pull that page down when your device goes missing), then a report will be generated. I like having this control and approach. When I tried to install via the dmg provided at their website, my only option was to use their command center so here is what I did instead:

  1. Crack open the terminal (or use iTerm, like a boss). I’m assuming a basic knowledge of the terminal.
  2. First we need to get the client:
    git clone https://github.com/prey/prey-bash-client.git
  3. Edit the config file in the client root directory. Edit: "check_url", "post_method", "mail_to", "smtp_server", "smtp_username", "smtp_password".

    • If you’re using gmail don’t use @gmail.com in your username.
    • As noted in the comments, you need to Base64 encode your password:
      echo -n "password" | openssl enc -base64
  4. If you try to run ./prey.sh from the client at this stage it will complain about no active modules. Don’t bother running it yet.
  5. It was not immediately obvious to me but we also need to separately get the latest modules. Modules allows us to do things like determine geographic location and take a picture with the webcam:
    git clone https://github.com/prey/prey-bash-client-modules.git
  6. If like me you’re thinking well this is simple let’s link these:

    ln -s ../bash-client-modules modules

    You would be wrong. Prey is expecting to use find which will not traverse through symlinks. Copy the contents of module repository directly into the client project into modules/ dir.

  7. Don’t run the default modules. It will lock the screen and sound an alarm. The password is preyrocks, yes I found out the hardway.

    rm -rf modules/lock/
    rm -rf modules/alarm/
  8. Now let’s move the client to the conventional place and set up the cron task.

    sudo mv prey-bash-client /usr/share/prey
    (sudo crontab -l | grep -v prey; echo "*/20 * * * * /usr/share/prey/prey.sh > /var/log/prey.log") | sudo crontab -

    It might output:

    crontab: no crontab for root

    Don’t be alarmed — it’s doing this because the command first lists cron tasks to ensure that you don’t already have a prey task.

I think the code makes a number of reasonable assumptions about things like modules, but I didn’t understand them going into working on this which caused me to take a little more time than I had anticipated.

I think the project has an excellent goal — though it could be reasonably debated how effective it would be if you’re using full disk encryption, since the person who “finds” the laptop will have little option but to wipe the hard drive which would take prey out of the picture. However, if the machine hasn’t been restarted yet there would be hope…

I haven’t been able to publish too much lately about Mymail-Crypt for Gmail, but will try to post soon about both it and OpenPGP.js

Restaurant Week DC!

I found out today that it is Restaurant week in DC. I quickly found the official website, and equally quickly found out that it was hard for me to figure out things I wanted to know, like where these restaurants are, and what Yelp thinks of them. The only logical conclusion was to make a website do exactly that. I ended up using my site to find a place to eat for dinner, and it was delicious 🙂

Currently, I’ve overrun my Yelp requests for the day, I’m going to work on getting the Yelp functionality integrated again, ASAP.

Check out the site at r.prometheusx.net, what do you think?

Basic screenshot of the DC Restaurant Week 2012 application

Technical Details

Gathering the information

In order to gather information about all of the restaurants from the official site at first I was a little unsure. Then I realized I could just use jQuery to gather all of the elements and create a json object that I could use directly in this page.

Below is the bulk of my parsing code, I was then able to JSON.stringify an array of these restaurant objects to easily copy the data.

  $('.formfont_black b').each(function (){
    var parentColumn = $(this).closest('td');
    var restaurant = {};
    restaurant.name = $(this).html();
    restaurant.url = $(this).closest('a').attr('href');
    var lineSplit = parentColumn.html().split('<br>');
    restaurant.addr = lineSplit[1];
    restaurant.phone = lineSplit[2];
}

What database?

I thought about setting up a quick Rails application for the backend of this, but then realized that there was really limited value in a database since this information is all static, and there’s not that much of it. Therefore, I’ve dumped most of the content directly into the javascript files. If this were a more serious application this could easily be adjusted.

Third Party Integration

Google – I quickly realized that the geocoding API for Google Maps was severely going to throttle my ability to look up restaurants. It limits you to, I believe, ~11 queries per second. Therefore, in order to map all 250 restaurants, I mapped them once and just saved that data into a JSON map, the same way as the restaurant information.

I’ve pasted my hacked together method to get all of the geocoded information. I was then able to JSON.stringify() the result

      function geocode_address(map, geocoder, restaurant){
        geocoder.geocode( {address:restaurant.address}, function(results, status){
          if (status == google.maps.GeocoderStatus.OK) {
          var marker = new google.maps.Marker({map:map, position:results[0].geometry.location});
          google.maps.event.addListener(marker, 'click', function(){
            yelpRequest(restaurant, marker);
            });
          good++;
          goodAddresses[restaurant.address] = results[0].geometry.location;
          }
          else {
            bad++;
            setTimeout(function(){
              geocode_address(map,geocoder,restaurant);
            }, 100);
          }
        });

Yelp – this integration initially went pretty smoothly other than the fact the Yelp API does not like to let you have users directly authenticate which is a serious problem when I’m running the application without a backend. Now, I’ve run into the problem of hitting the ridiculously small number of daily queries (100). I’m working on getting this upgraded.